Home > docs > getting started > Development
Development
The following instructions are needed for developing Concord itself.
Database
A locally-running instance of PostgreSQL is required. By default, the server
will try to connect to localhost:5432 using username postgres, password
q1 and database name postgres.
The easiest way to get the database up and running is to use an official Docker image:
docker run -d -p 5432:5432 --name db -e 'POSTGRES_PASSWORD=q1' library/postgres:10.4
Running from an IDE
You need to build the project before you can load it into an IDE.
It is possible to start the server and an agent directly from an IDE using the following main classes:
- concord-server:
com.walmartlabs.concord.server.dist.Main - concord-agent:
com.walmartlabs.concord.agent.Main
The server requires a configuration file to start. Set ollie.conf JVM
parameter to the path of your local server.conf. Check the
Server Configuration File for details.
Here’s an example of the Server’s launch configuration in Intellij IDEA:

To start the UI, please refer to the console’s readme file.
Debugging
The concord-server and concord-agent processes can be started in debug mode as
normal Java applications.
However, as the agent processes its payload in a separate JVM, it must be
configured to start those processes with the remote debugging enabled. To
enable the remote debugging add _agent.json to the root directory of the
process’ payload (so either into your GIT repository or into the payload
archive) with this content:
{
  "jvmArgs": ["-Xdebug", "-Xrunjdwp:transport=dt_socket,address=5005,server=y,suspend=y"]
}
jvm arguments can also be specified in the requirements section of the
configuration:
configuration:
  requirements:
    jvm:
      extraArgs:
        - "-Xdebug"
        - "-Xrunjdwp:transport=dt_socket,address=5005,server=y,suspend=y"
Note: If both configurations exist, then _agent.json takes the priority.
This makes all processes to listen on port 5005 for incoming connections from
an IDE. Make sure to change the port number if you plan to debug multiple
processes simultaneously.
This method is suitable only for local development.
Building
To skip NPM-related tasks when building the project:
./mvnw clean install -DskipTests -DskipNpm
Making a Release
All JAR files are signed using a GPG key. Pass phrase for a key must be configured in
~/.m2/settings.xml:
<profiles>
  <profile>
    <id>development</id>
    <properties>
      <gpg.passphrase>MY_PASS_PHASE</gpg.passphrase>
    </properties>
  </profile>
</profiles>
- use
maven-release-pluginas usual:./mvnw release:prepare release:perform - push docker images;
- don’t forget to push new tags and the release commit:
git push origin master --tags
Pull Requests
- squash and rebase your commits;
- wait for CI checks to pass.
Using OpenLDAP for Authentication
Assuming that Concord Server is already running in a server container.
- update the
ldapsection in the Concord Server’s configuration file:$ cat server.conf ... ldap { url = "ldap://localhost:389" searchBase = "dc=example,dc=org" principalSearchFilter = "(cn={0})" userSearchFilter = "(cn=*{0}*)" usernameProperty = "cn" systemUsername = "cn=admin,dc=example,dc=org" systemPassword = "admin" } ... - Restart the server if it was running:
docker restart server - start the OpenLDAP server. The easiest way is to use Docker:
docker run -d --name oldap --network=container:server osixia/openldapCheck the container’s logs:
... 5a709dd5 slapd starting ... - create a user’s LDIF file:
$ cat myuser.ldif
dn: cn=myuser,dc=example,dc=org
cn: myuser
objectClass: top
objectClass: organizationalRole
objectClass: simpleSecurityObject
objectClass: mailAccount
userPassword: {SSHA}FZxXb9WXU8yO5VgJYCU8Z+pbVzCJisNX
mail: myuser@example.org
This creates a new user
myuserwith the passwordq1. - import the LDIF file:
$ cat myuser.ldif | docker exec -i oldap ldapadd -x -D "cn=admin,dc=example,dc=org" -w admin adding new entry "cn=myuser,dc=example,dc=org" -
use
myuserandq1to authenticate in the Concord Console: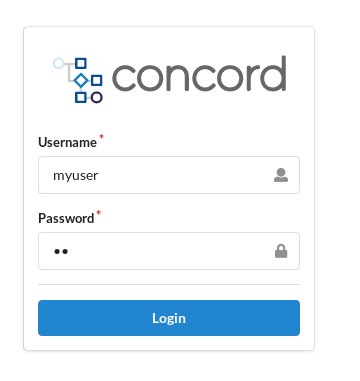
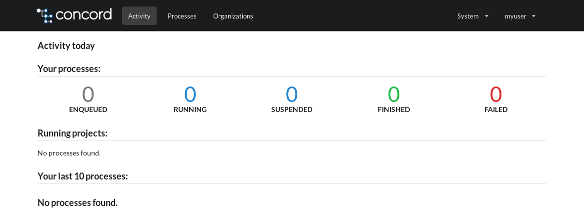
-
after successful authentication, you should see the UI similar to this: